Disclosure: Some of the links in this post are affiliate links, which means that if you make a purchase through them, I may earn a small commission at no additional cost to you. I only recommend products that I believe will genuinely help you in your journey to earn money from home. These commissions allow me to keep creating helpful content and sharing practical advice, so thank you for supporting my blog!
Engage Your Students This Thanksgiving
Hi there, fellow educators! As a 37-year-old teacher with over a decade of experience in the classroom, I know firsthand how chaotic the weeks leading up to Thanksgiving can be. Between parent conferences, holiday planning, and keeping our students engaged (and calm!), this time of year can feel overwhelming.
That’s why I’ve discovered that creative, hands-on activities are an absolute lifesaver. They help students stay focused, channel their energy into something productive, and make lasting holiday memories in the process.
This year, I’m using a resource I absolutely love: Thanksgiving Guided Drawings. It’s a simple yet effective way to bring the festive spirit into the classroom while keeping students engaged and learning. Whether you’re teaching little ones who are still learning to draw or older kids who just need a fun brain break, this resource is perfect for everyone.
In this post, I’m going to share how this resource works, why guided drawings are such a hit, and some creative ways you can use it in your own classroom. Let’s make this Thanksgiving a holiday to remember—for you and your students!
What Are Thanksgiving Guided Drawings?
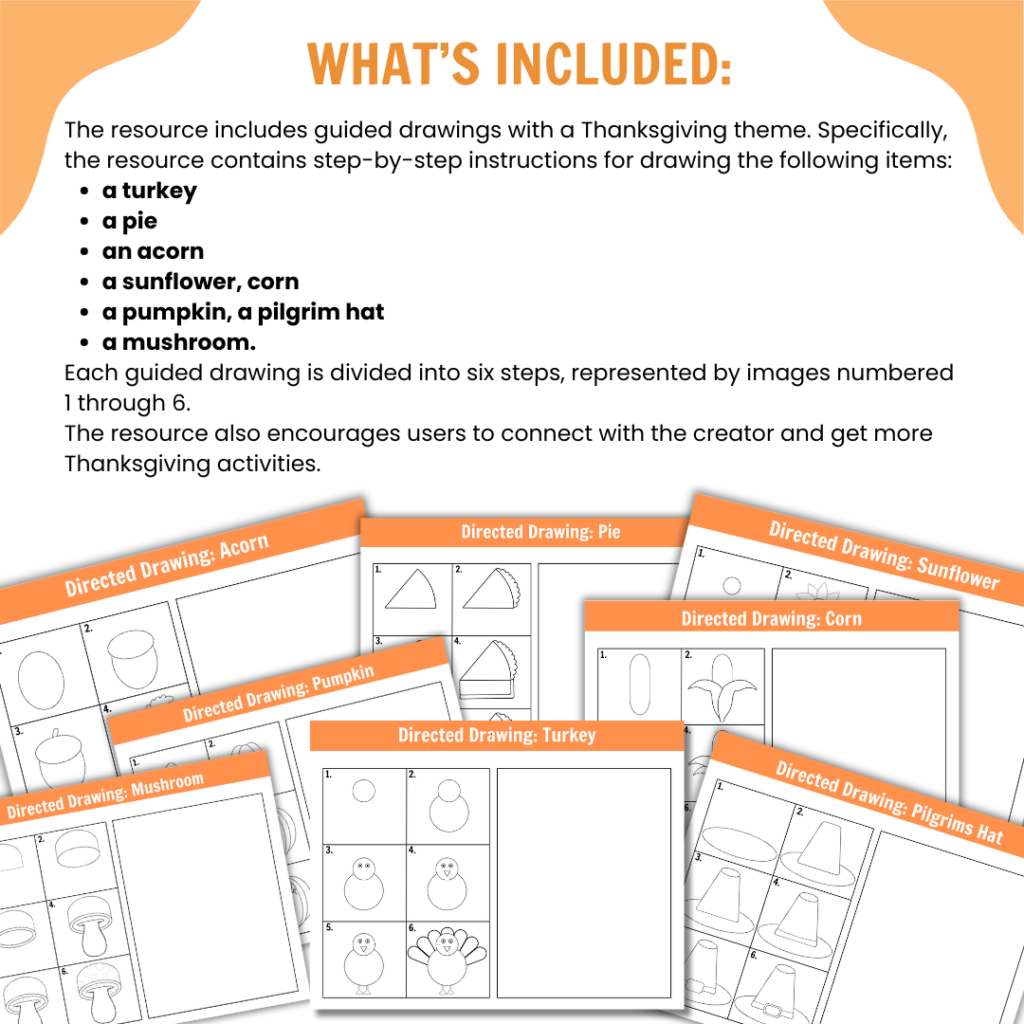
Thanksgiving Guided Drawings are a simple, creative resource designed to make holiday-themed art accessible and fun for all students. The idea is to break each drawing into six clear, easy-to-follow steps, helping kids of any skill level create something they can feel proud of.
This resource focuses on Thanksgiving classics, giving students the chance to draw:
- A turkey
- A pumpkin
- A pie
- Corn
- An acorn
- A sunflower
- A pilgrim hat
- A mushroom
Each drawing is introduced as a step-by-step process. Starting with the most basic shapes, students gradually build their artwork, finishing with a detailed, festive piece. The instructions are visual, so even young learners or students who struggle with reading can follow along easily.
One of the things I love most about this resource is how versatile it is. Whether you want a full art lesson, a quick warm-up activity, or even a center for early finishers, these guided drawings fit seamlessly into your classroom routine. They also work beautifully for students who might feel intimidated by drawing, as the simple steps ensure success and build confidence.
In my experience, this kind of structured creativity keeps students engaged and encourages them to explore their artistic side in a stress-free way. And what better way to celebrate Thanksgiving than with a little creativity and a lot of fun?
Why Guided Drawings Are Great for the Classroom
Guided drawings aren’t just fun—they’re an incredibly effective teaching tool. Over the years, I’ve noticed how much my students benefit from structured creative activities like these, especially during high-energy times like the holiday season.
Here are a few reasons why guided drawings work so well in the classroom:
- Develops Fine Motor Skills
For younger students, activities like drawing help strengthen fine motor skills, which are essential for writing and other tasks. Even older students benefit from the hand-eye coordination that comes with creating detailed drawings. - Encourages Focus and Patience
Following step-by-step instructions requires students to slow down, pay attention, and practice patience. These are critical skills that translate into other areas of learning. - Builds Confidence in Artistic Abilities
Many students feel intimidated by drawing, especially if they believe they aren’t “good at art.” With guided steps, they can see their progress unfold and feel proud of what they’ve accomplished. - Fosters Creativity
While the steps provide structure, students still have room to make each drawing their own. They can experiment with colors, patterns, and even additional details. - Adds Festive Fun to the Curriculum
The Thanksgiving theme makes these drawings a great way to incorporate a little seasonal joy into your day. It’s a nice balance of learning and celebration.
To make this activity even easier, consider having the right supplies on hand. High-quality colored pencils and fine-tip markers are ideal for adding detail and vibrant color to the drawings. I also recommend using heavy-duty drawing paper to prevent bleed-through and give students a sturdier canvas to work on.
For teachers looking to add extra flair to the activity, gel pens or metallic markers can help create standout details like sparkling corn kernels or shimmering pumpkin highlights. These little touches really elevate the artwork and excite students.
Creative Ways to Use This Resource
Thanksgiving Guided Drawings aren’t just for quiet art lessons—they’re a versatile resource you can use in so many ways to enhance your classroom activities. Here are a few creative ideas to get the most out of them:
1. Art Stations or Centers
Set up a dedicated art station with the guided drawing sheets, colored pencils, and fine-tip markers. Students can rotate through the station during independent work time or centers. This works especially well for early finishers who need a meaningful activity while others catch up.
2. Thanksgiving Cards
Encourage students to turn their drawings into thoughtful cards. Provide blank cardstock and let them fold it into a card format. They can add their drawing to the front and write a heartfelt Thanksgiving message inside for family, friends, or school staff.
3. Bulletin Board Display
Turn your students’ creations into a festive classroom display. Use bulletin board borders and push pins to create a “Thanksgiving Gallery” featuring all their artwork. It’s a great way to build pride in their work while brightening up your space.
4. Cross-Curricular Integration
Combine the guided drawings with lessons in other subjects:
- Writing: Have students write a descriptive paragraph about their drawing, focusing on sensory details like colors, textures, and smells.
- Science: Use the drawings of corn or sunflowers to discuss plant life cycles or harvest traditions.
- History: Incorporate the pilgrim hat drawing into lessons about the first Thanksgiving.
5. Collaborative Art Projects
Turn the individual guided drawings into a large-scale class project. For example, students can combine their pumpkins, corn, and sunflowers into a mural showcasing a Thanksgiving scene. Use adhesive dots to arrange the pieces on a large poster board or butcher paper.
With just a few supplies and a little creativity, these guided drawings can become the centerpiece of your Thanksgiving classroom celebrations.
Tips for Using the Resource
To make the most of the Thanksgiving Guided Drawings resource, it helps to have a few strategies in place. These tips will ensure your students have a smooth, creative, and fun experience while using the resource:
1. Prep Materials Ahead of Time
Have all the supplies ready before the activity begins. Stock up on colored pencils, fine-tip markers, and drawing paper. For younger students, consider pre-cutting sheets to fit into binders or art folders so they stay organized.
2. Use a Document Camera or Projector
For whole-class instruction, project the step-by-step guides using a document camera or mini projector. Walk your students through each step, giving them time to follow along.
3. Encourage Personalization
While the steps are clear, let your students add their own creative touches. For instance, they could draw patterns on the pilgrim hat or add a unique design to their pumpkin. Keep a set of gel pens or metallic markers on hand for those who want to take their drawings to the next level.
4. Plan for Early Finishers
Some students will finish their drawings quickly, so have optional extension activities ready. These could include:
- Coloring their drawings with watercolor pencils for a painted effect.
- Writing a short Thanksgiving story featuring their artwork.
- Creating a border or background for their drawing using decorative scissors or washi tape.
5. Celebrate the Results
Once the activity is done, showcase your students’ hard work. Whether it’s a classroom bulletin board, a hallway display, or simply sending the artwork home, make sure students feel proud of their creations. You can even host a mini art show by setting up a display table and inviting other classes or parents to view the drawings.
With a little preparation and encouragement, this resource can become a highlight of your Thanksgiving activities. Let me know when you’re ready for the final section!
Tips for Using the Resource
To make the most of the Thanksgiving Guided Drawings resource, it helps to have a few strategies in place. These tips will ensure your students have a smooth, creative, and fun experience while using the resource:
1. Prep Materials Ahead of Time
Have all the supplies ready before the activity begins. Stock up on colored pencils, fine-tip markers, and drawing paper. For younger students, consider pre-cutting sheets to fit into binders or art folders so they stay organized.2. Use a Document Camera or Projector
For whole-class instruction, project the step-by-step guides using a document camera or mini projector. Walk your students through each step, giving them time to follow along.
3. Encourage Personalization
While the steps are clear, let your students add their own creative touches. For instance, they could draw patterns on the pilgrim hat or add a unique design to their pumpkin. Keep a set of gel pens or metallic markers on hand for those who want to take their drawings to the next level.
4. Plan for Early Finishers
Some students will finish their drawings quickly, so have optional extension activities ready. These could include:
- Coloring their drawings with watercolor pencils for a painted effect.
- Writing a short Thanksgiving story featuring their artwork.
- Creating a border or background for their drawing using decorative scissors or washi tape.
5. Celebrate the Results
Once the activity is done, showcase your students’ hard work. Whether it’s a classroom bulletin board, a hallway display, or simply sending the artwork home, make sure students feel proud of their creations. You can even host a mini art show by setting up a display table and inviting other classes or parents to view the drawings.
With a little preparation and encouragement, this resource can become a highlight of your Thanksgiving activities. Let me know when you’re ready for the final section!
Extend the Thanksgiving Fun
Once your students have mastered their Thanksgiving Guided Drawings, there are plenty of ways to build on the activity and keep the creative energy flowing. Here are some ideas to extend the fun while reinforcing learning:
1. Explore More Thanksgiving-Themed Activities
Pair the guided drawings with complementary projects:
- Writing Prompts: Encourage students to write stories or poems inspired by their drawings. For example, a turkey could inspire a story about its journey to avoid becoming dinner.
- Math Connections: Use the pie drawing to discuss fractions, or count how many seeds a sunflower might have.
- History Discussions: Dive into the meaning of Thanksgiving and how items like pumpkins and pilgrim hats connect to its traditions.
2. Add Craft Elements
Turn the drawings into mixed-media projects by combining them with craft materials. Offer students supplies like construction paper, glitter glue, or googly eyes to bring their creations to life. For instance, they could create a 3D turkey by attaching feathers to their drawing.
3. Collaborate with Other Classes
Coordinate with other teachers to create a Thanksgiving-themed event. For example:
- Display all the artwork together in a shared hallway or library space.
- Organize a “gallery walk” where students visit and admire each other’s work.
- Combine artwork with Thanksgiving songs or performances for a celebration day.
4. Create Take-Home Projects
Students love sharing their work with family. Consider turning their drawings into laminated placemats using self-adhesive laminating sheets. These make wonderful Thanksgiving table decorations that students can proudly show off during the holiday.
5. Follow the Creator for More Resources
The guided drawings are just one way to celebrate Thanksgiving. Encourage students and families to explore additional seasonal activities by staying connected with the creator. There are countless opportunities for festive fun, from holiday-themed writing prompts to math games and puzzles.
Thanksgiving Guided Drawings are more than just an art project—they’re a gateway to learning, creativity, and celebration. By extending the activity into other areas of your curriculum, you can ensure your students have an engaging and meaningful holiday experience.
Ready to bring these ideas to your classroom? Start by downloading the resource, gathering your materials, and letting your students’ imaginations take flight!


